TSC Label Printer Calibration
TSC label printer calibration is easy in most cases but if you get stuck, Positive ID Labellling can offer free support to qualifying customers.
This guide will help you calibrate your TSC label printer to the labels that are in it – specifically, this guide is for ‘die-cut’ labels with gaps between each label. Your printer ‘sees’ gaps between the labels via an opto-electrical sensor which must be clear of any debris. It is advisible to examine the sensor and use a brush to remove any lint that may be intefering with its operation.
You can find user manuals to identify the location of your gap sensor on the technical support page.
The TSC label printer calibration process is broadly the same for all TSC desktop label printers. Industrial printers have a different interface and there is more about industrial TSC label printer calibration after the desktop explanations. There are three methods of TSC label printer calibration described here:
- Automatic
- Automatic via Label Direct (page)
- Semi-Automatic via Diagnostic Tool (download)
- Manual via Diagnostic Tool (download)
Automatic desktop TSC label printer calibration
Your printer is designed to complete basic functions without the need for a computer to communicate with the printer. In the first instance – and on every new roll of labels installed in the printer or roll change – you should conduct this simple calibration process:
- Turn the printer off at the back with the power switch
- Press and hold the feed key on the front/top of the printer
- With your labels in the printer
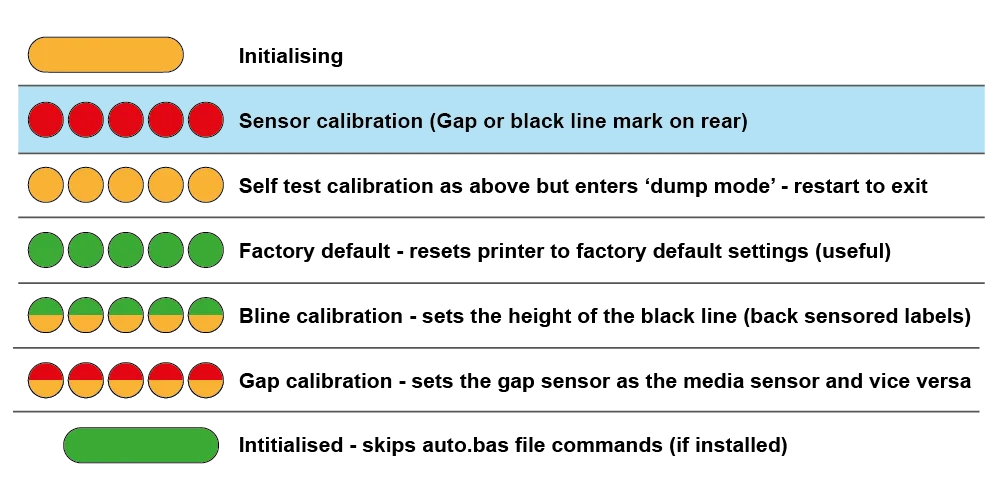
- Watch the LED light on the printer next to the feed button
- It should blink green then amber, then red, red, red, red, red
- During the red blinks, release the feed key
- The printer will slowly (and noisily) feed labels out
- It should stop in 3-4 labels
- Once it has finished, press the feed key once
- The printer should eject a single label, accurately for removal
- If it continues past 10 labels, explore Semi Automatic calibration method (and consider troubleshooting).
LED Colours showing for Automatic TSC Label Printer Calibration
Industrial TSC label printer calibration can normally be achieved using the touch screen or control panel below the touchscreen on the front of the printer. Industrial TSC label printer calibration instructions:
- Press Menu key
- Select Sensor option
- Select Auto Calibration snd select the calibration type – gap, black mark or continuous
- The printer should feed some labels out slowly (and noisily)
- When complete, it will feed a final label
- The green indicator light should be on
- Press the feed key once – this should feed a single label accurately
- If the auto calibration function is unsuccessful, move to the semi automatic TSC label calibration instructions below.
Automatic TSC label printer calibration via Label Direct
You must have Label Direct installed on your computer to use this method.
- Open Label Direct on your computer
- Click File > Print Setup…
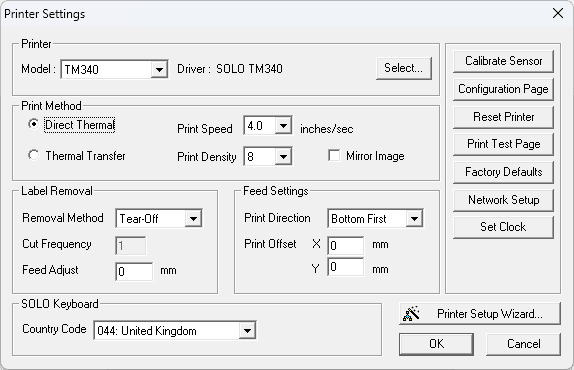
- Click Calibrate Sensor
- The printer will start feeding labels slowly (and noisily)
- Wait for the label calibration to complete
- Press the feed key on the printer – it should eject to the correct gap location
If the calibration attempt fails, escalate to the semi-automatic method below.
Semi-Automatic industrial and desktop TSC label printer calibration
For semi-automatic desktop label printer calibration, you will need to use (download) the Diagnostic Tool – this is included with the Label Direct software we supply with your printer. To open the Diagnostic Tool, launch Label Direct, click Help, then click Diagnostic Tool.
- With Labels in your printer and the printer turned on
- Start the Diagnostic Tool
- Click the unit “mm” option at the top
- Click the Get button
- The diagnostic tool will populate with data about your printer
- Click the Calibrate Sensor button on the top left of the Diagnostic Tool
- This will open the calibrate sensor dialogue
- In the Auto Calibration area, put the height of your label in mm
- Put the gap for your labels
- Select the Media Type on the right hand side (GAP)
- Then click the Calibrate button in the Auto Calibration area
- The printer will slowly (and noisily) feed labels out
- It should stop in 3-4 labels
- Once it has finished, press the feed key once
- The printer should eject a single label, accurately for removal
- If it continues past 10 labels, explore Manual Calibration method (and consider troubleshooting).
Manual industrial or desktop TSC label printer calibration
If the fully automatic and semi-automatic label printer calibration methods have not been successful, a manual TSC label printer calibration may resolve the problem.
For manual industrial and desktop label printer calibration, you will need to use (download) the Diagnostic Tool – this is included with the Label Direct software we supply with your printer. To open the Diagnostic Tool, launch Label Direct, click Help, then click Diagnostic Tool.
- Important: Check your label path is webbed correctly
- Important: Check the gap sensor is not obstructed or fouled
- With Labels in your printer and the printer turned on
- Start the Diagnostic Tool
- Click the unit “mm” option at the top
- Click the Get button
- The diagnostic tool will populate with data about your printer
- Click the Calibrate Sensor button on the top left of the Diagnostic Tool
- This will open the calibrate sensor dialogue
- In the Manual Setup box, click “Calibrate”
- The dialogue will respond with “Put linner please” (typo of “liner”)
- The liner is the material the labels are stuck to
- Peel a label off and then move the liner so that it is positioned under the gap sensor.
- As a general rull for desktop printers this will mean between the roll of labels and the ejection port of the printer.
- Click Next
- The dialogue will respond with the phrase “Put label please”
- Open the print head and move the labels so a label is positioned under the sensor
- Click Next
- If successful, the dialogue will respond with “Calibration is complete”
- Click Set – to save the settings
- The printer may eject some labels – this is normal.
- The labels should eject to the correct gap for removal
- Press the feed key once to verify
If the manual TSC label printer calibration process failed, you can repeat the process, but adjust the settings for “Sensor Intensity” and “Reading Intensity”.
Sensor Intensity: This is the ‘power’ of the gap sensor – the strength of the light it uses (infra red). You can turn it up or reduce it. There are no limits but you can use between 1 and 15.
Reading Intensity: This is the sensitivity of the gap sensor. If you set sensor and reading intensity high, then you will ‘dazzle’ the sensor as the emitting light will be too bright.
If you are struggling, it is best to continue trying using different settings in a structured way. So start with a low reading intensity and progressively increase the sensor intensity. Your objective is to get as big a gap in the values between the “Label Reading” (you want that to be low) and the “Gap Reading” (you want that to be high).
Frequently Asked Questions
Q: The manual TSC label printer calibration is difficult – why is this? A: The hardware is built in Taiwan, so there are some language barriers, but the process is quite logical. Think of it like a flashlight shining through curtains – the printer is trying to find the right settings that make it look dark when there is a label and light when there isn’t – that lets the electronics verify the bit of the label under the print head.
Q: Why does TSC label printer calibration need to be done? I am using the same labels from the same supplier. A: The labels are made from stock supplied by big material manufacturers, and despite the manufacturing being generally uniform, there are always variations in the feedstock used to make your labels. These variations are beyond the final label manufacturer’s control and sometimes confuse the printer’s settings, making it difficult to print accurately.
Q: I have tried all methods, and the TSC label printer calibration is still failing – what can I do? A: There are a few common issues – firstly, is your gap sensor clean? Most people do not maintain or clean their printers in accordance with manufacturer guidelines. Check for debris in the gap sensor window – a dry paint brush or even a little rubbing alcohol can clean it up (do not use water). If all else fails and you are a customer, call us on 01332 864895, and we can help.
Secondly, on industrial printers in particular, make sure the gap sensor is positioned correctly at the centre of the label. Ensure the labels are passing through the gap sensor and not over the top of it (where it has no chance of seeing the gaps).
Q: How often should I calibrate my printer? A: The general rule is “every time you change the roll of labels” – even if they are supplied from the same supplier and the same order. You should also give it a general clean on every change of rolls – this should include wiping over the chassis with a damp cloth (not sodden). You should never use water-based cleaning in the printer itself – only alcohol based cleaners and lint-free cloths. Brush out (or blow out) ‘liner straw’ at least once a month. Examine your printer and check for adhesive residue buildup. Apply a little vaseline with a cotton bud to the roll core holder from time to time. Refer to the thermal printer maintenance page for more details.
Q: I cannot get my printer to calibrate – what do I do now? A: We can help – if you are a current customer buying labels from us, we give free technical support. We can help work through the issue. We do this using Anydesk.com for remote support and sharing images over WhatsApp.
And this is proven in our Truspilot Reviews (4.9 as of January 2026) and Google Reviews (5.0 as of January 2026)
I had an amazing experience working with Positive ID Labelling, especially Natalie. The labels were absolutely brilliant quality and exceeded my expectations. Natalie was fantastic throughout the whole process. Communication was amazing from start to finish. She was so helpful, guided me through everything, and made the whole experience stress free and enjoyable. She was also genuinely funny and a pleasure to work with, which made everything even better. I’ll definitely be working with Natalie again on future projects and would highly recommend Positive ID Labelling to anyone looking for high-quality labels and excellent customer service.
Absolutely brilliant service from start to finish. The team are brilliant and the product was excellent quality and exactly what I wanted. Natalie is amazing as are her colleagues. Will definitely be a returning customer. Thank you
We’ve had a great experience working with this supplier, especially with Natalie - she is always very responsive, professional, and friendly. The pricing is highly competitive and the sales service has been excellent from start to finish. If I could offer one suggestion, it would be to improve the account and invoice management process. It would be really helpful if there were a system for clients to easily track their past orders and invoices in one place. Overall, very pleased with the service and look forward to continuing our collaboration.
Ive used Positive ID Labelling Ltd for all our egg box labels for many years now. Natalie is always above and beyond helpful and the service is exceptionally fast and efficient.
Free Technical Support for Customers
Positive ID Labels are proud to offer free technical support to all our thermal label printing customers. So long as you are buying labels from us, we are here to help. Call 01332 864895 or fill in a contact form. If you are not a customer, ordering a qualifying amount of labels will ensure we can help you get back up and running.
Quality
We couple our modern equipment with a comprehensive and mature ISO 9001 quality management system to help minimise errors and failings in processing orders.
This means that we deliver on time, first time over 99% of the time.
Value
We understand the pressures of inflation and costs on our customers.
By maximising efficiency and minimising waste and errors in production, we can offer competitive pricing to keep your costs low.
Service
We know what we are doing and we exploit that knowledge to get things done properly and at speed.
We know your business stops when you cannot label your products, so getting your product to you fast and right first time to keep your business running
Speed
We know our customers do not want to put up with the industry standard delivery times and we focus on disrupting the norm by prioritising speedy delivery.
We implement internal producion planning with AI to maximise throughput in our factory and deliver you labels fast.