SOLO Printer Installation Instructions
This SOLO printer installation guide is to be used in conjunction with SOLOised versions of TSC printers. If you have a non-SOLOised TSC printer, you should use the standard TSC thermal printer installation instructions.
Positive ID Labelling prides itself on customer support – and particularly technical support. If you are having any difficulties (and you bought your printer from us), you can call 01332 864895 and ask for support. Remote installation and ongoing support are included with all printers we supply to our customers. You can download a copy of AnyDesk here to prepare for remote support (internet required).
Prerequisites
- A Microsoft Windows-based computer (7, 8, 10 and 11) – We do not support Apple or Linux devices.
- You will require administrative rights on your computer.
- If your account is restricted, you will need assistance from your IT team (This usually applies to schools and large businesses)
Step 1: Downloads
Download these two files
- Printer Driver: SOLO Printer Drivers
- Labelling Software: Label Direct for SOLO software
Extract the SOLO printer drivers.
- These should have downloaded into your “Downloads folder”.
- Open Windows Explorer (WinKey + E)
- Browse to Downloads
- Select the “solodrivers_cd.zip” file
- Right-click the file and select “extract all”, then “extract” on the following dialogue
- You can close the window after extraction
This will deliver an open folder with the printer drivers within your downloads folder that you will use later.
Step 2: Hardware setup
- Unpack your printer; if a CD is supplied with it, ignore this for now.
- Connect your printer to power and to the computer using the supplied USB cable.
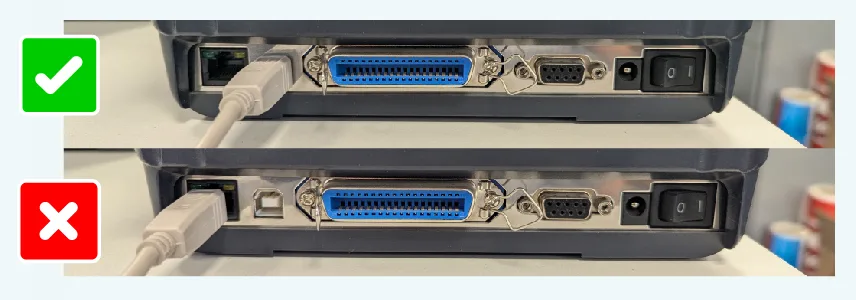
- NOTE: If you are using a TC200 chassis, ensure the USB plug is not inserted into the network port on the back of the printer.
Step 3: Driver Installation
- Open the Settings on your computer (Search: Settings)
- Navigate to the (Bluetooth and devices: Printers and Scanners
- Click Add device
- Wait until the “Add a new device manually” appears, then click it
- Select Add a local printer or network printer with manual settings
- Select a port on the “Use existing port:” option
- The printer should be identifiable in one of the “USB” ports listed – if not, switch the printer off and select LPT1 and continue*
- On the next dialogue box, click the “Have Disk” option
- On the next dialogue box, click browse and browse to the solo driver folder you unpacked in the downloads folder
- Select the “AUTORUN.INF” file and click Open
- Click OK
- Select the SOLO model printer from the list and click NEXT (See below)
- The printer should now install the correct driver for your printer
*If you could not find the printer on the list, switch it back on now and Windows should assign the driver.
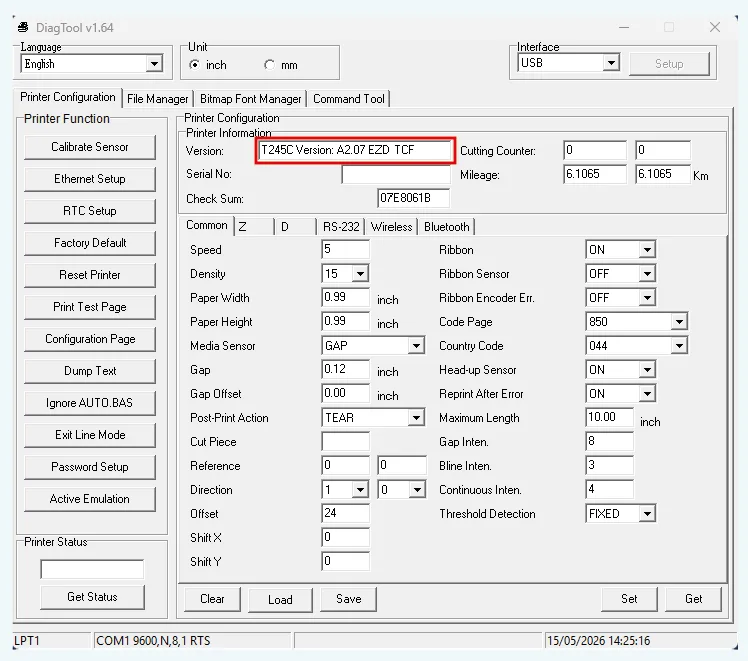
If you are unsure of the SOLO printer version you own, you can find it using the Diagnostic Tool software. Download from the link and run the file (double-click or “Open” in your browser).
When you open the file, the Diagnostic Tool software should populate and show you the model of SOLO printer connected to your computer – see image below showing a T245C model.
Step 4: Software installation
- Run the appropriate installation package (labeldirect_solo.exe).
- Follow the on-screen installation instructions, select mm when asked, and select your printer when asked.
- You should now see 2 new icons on your desktop – Label Direct for SOLO and Direct Print for SOLO.
- Once installed, you may need to restart your computer; this is recommended anyway.
Step 5: Testing
- Now you can test that everything is working, open Label Direct, on the right you will see Printer Settings, click Change and confirm that your correct printer model and printer driver are selected.
- Also, be sure that your print method (Direct Thermal or Thermal Transfer) is correctly set.
- Now close this pop-up.
- Now click on Help (top bar) and open Diagnostic Tool.
- At the bottom left of this, click Get Status – it should say Ready above the button.
- Now you are ready to design and print.
Refer to the Label Direct Training Videos to design and print your labels.
Browse the full Technical Support range for related products.
I had an amazing experience working with Positive ID Labelling, especially Natalie. The labels were absolutely brilliant quality and exceeded my expectations. Natalie was fantastic throughout the whole process. Communication was amazing from start to finish. She was so helpful, guided me through everything, and made the whole experience stress free and enjoyable. She was also genuinely funny and a pleasure to work with, which made everything even better. I’ll definitely be working with Natalie again on future projects and would highly recommend Positive ID Labelling to anyone looking for high-quality labels and excellent customer service.
Absolutely brilliant service from start to finish. The team are brilliant and the product was excellent quality and exactly what I wanted. Natalie is amazing as are her colleagues. Will definitely be a returning customer. Thank you
We’ve had a great experience working with this supplier, especially with Natalie - she is always very responsive, professional, and friendly. The pricing is highly competitive and the sales service has been excellent from start to finish. If I could offer one suggestion, it would be to improve the account and invoice management process. It would be really helpful if there were a system for clients to easily track their past orders and invoices in one place. Overall, very pleased with the service and look forward to continuing our collaboration.
Ive used Positive ID Labelling Ltd for all our egg box labels for many years now. Natalie is always above and beyond helpful and the service is exceptionally fast and efficient.
Free Technical Support for Customers
Positive ID Labels are proud to offer free technical support to all our thermal label printing customers. So long as you are buying labels from us, we are here to help. Call 01332 864895 or fill in a contact form. If you are not a customer, ordering a qualifying amount of labels will ensure we can help you get back up and running.
Quality
We couple our modern equipment with a comprehensive and mature ISO 9001 quality management system to help minimise errors and failings in processing orders.
This means that we deliver on time, first time over 99% of the time.
Value
We understand the pressures of inflation and costs on our customers.
By maximising efficiency and minimising waste and errors in production, we can offer competitive pricing to keep your costs low.
Service
We know what we are doing and we exploit that knowledge to get things done properly and at speed.
We know your business stops when you cannot label your products, so getting your product to you fast and right first time to keep your business running
Speed
We know our customers do not want to put up with the industry standard delivery times and we focus on disrupting the norm by prioritising speedy delivery.
We implement internal producion planning with AI to maximise throughput in our factory and deliver you labels fast.